

Prototype design → frontend development → backend development → payment integration → resource deployment, the AI toolchain delivers a massive leap in development efficiency.
Hi everyone! I'm Luke, a developer who loves tinkering with AI. Recently I did something really interesting with AI tools: building a commercial mini-program with payment functionality from scratch, fully AI-driven, using Vibe Coding.
💡 Why did I take on this practice?
AI coding tools have been popping up everywhere lately — Cursor, Claude Code, Gemini CLI, Kiro, and more — but as I was learning, I noticed:
90% of the AI coding examples people show off on social media stay at the demo stage and never truly make it to commercial production
I also compared several companies' products, such as Lovable and v0. By integrating with Supabase, they can complete full-stack frontend and backend application development, and Lovable integrates with Stripe for payments, closing the loop for building products for overseas markets. But when my product's target users are in the domestic (China) market, these products built for overseas users seem to "not fit the local context":
- Compared to Stripe's credit-card payments, domestic users are more familiar with WeChat/Alipay payment methods.
- Domestic companies often have compliance requirements for their data and prefer domestic cloud providers, making Supabase less suitable.
So is there a way to find a "localized" AI full-stack development and commercial launch path? Let me show you how I did it.
🛠️ My AI tool stack
After some research, I chose this combination:
Core toolchain
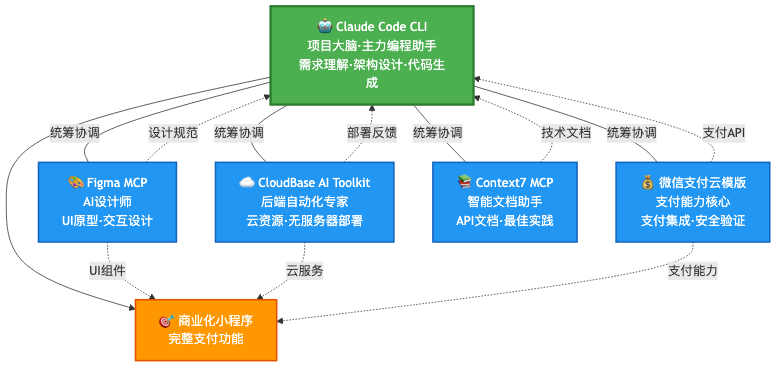
Detailed introduction to each tool
🤖 Claude Code CLI - the project brain
- Understands and decomposes complex business requirements, generating high-quality code and architecture designs
- Coordinates the collaboration between the various tools
☁️ CloudBase-AI-Toolkit - CloudBase AI tools:
- Provides CloudBase MCP for unified management of database, cloud functions, and static hosting
- Ships pre-built development templates and CloudBase best-practice rules
💰 CloudBase WeChat Mini-Program Payment Cloud Template - payment capability
- Out-of-the-box payment capability wrapper, eliminating complex signing and security verification
- Officially maintained, with guaranteed security and stability
🎨 Figma MCP - the AI designer
- Seamlessly integrates with AI coding tools
- Fast iteration and prototype validation
📚 Context7 MCP - the smart documentation assistant
- Intelligently searches the latest API docs and best practices
- Provides accurate code samples and configuration solutions
🎯 Full record of AI development
Step 1: Generating the AI design mockup
First, complete the design mockup with Figma AI:
-
Click the AI icon in the Figma page and select "First Draft"
-
Enter the following prompt
Generate a stylish clothing-purchasing e-commerce App, page requirements:
- Home page displays a waterfall flow of products
- Detail page displays product price, quantity, and other info
- Shopping cart displays all product items added to the cart
- Personal center displays my orders, shipping addresses, and other info
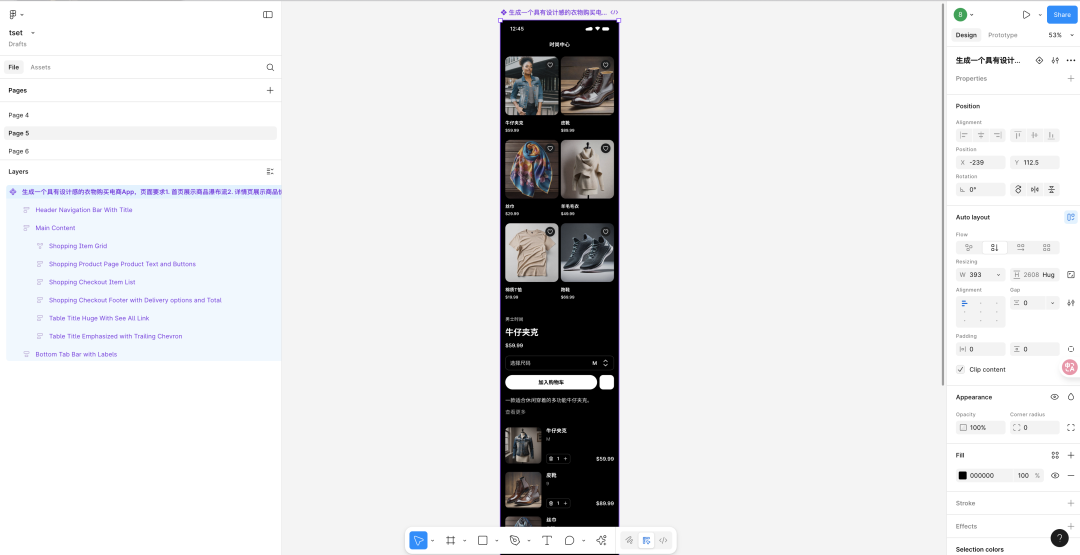
Note: here Figma AI generates a single page mockup. This mockup merges multiple pages together, but that doesn't stop Claude Code from invoking tools to understand it.
Step 2: Vibe Coding project preparation
Here we prepare the project before Vibe Coding by following these steps:
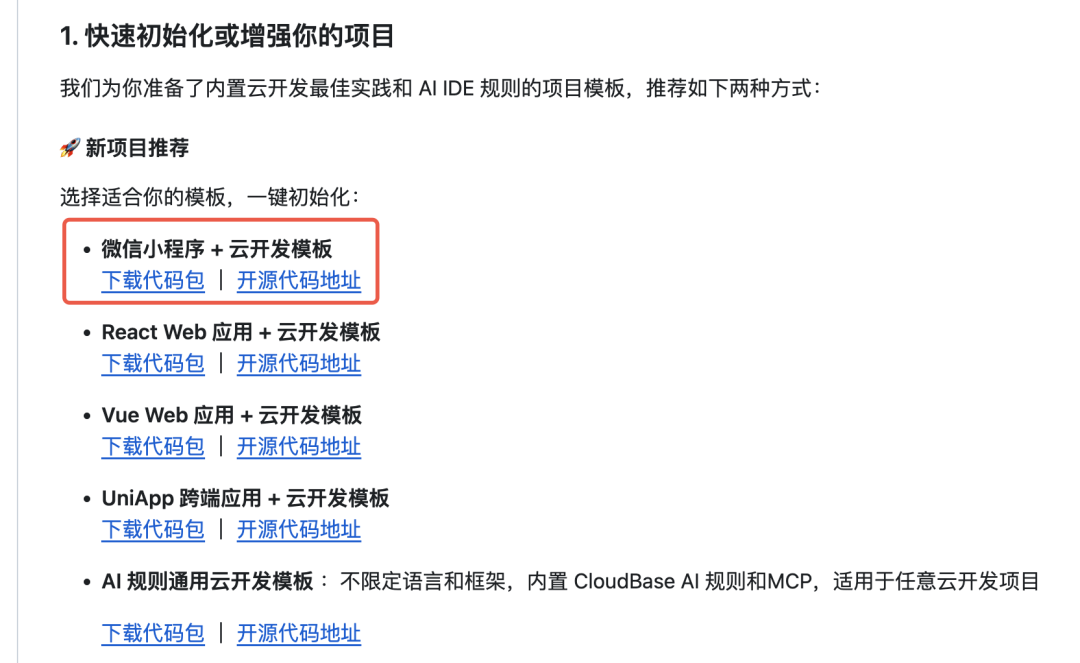
- Download a project template: CloudBase-AI-Toolkit offers various development templates for WeChat Mini Program, Web, Uniapp cross-platform, and more. Here we download the WeChat Mini Program template.
The benefit of a template is that it already includes CloudBase best-practice rules and the CloudBase MCP configuration
- Open VSCode/Cursor (or another coding IDE), open the terminal, run
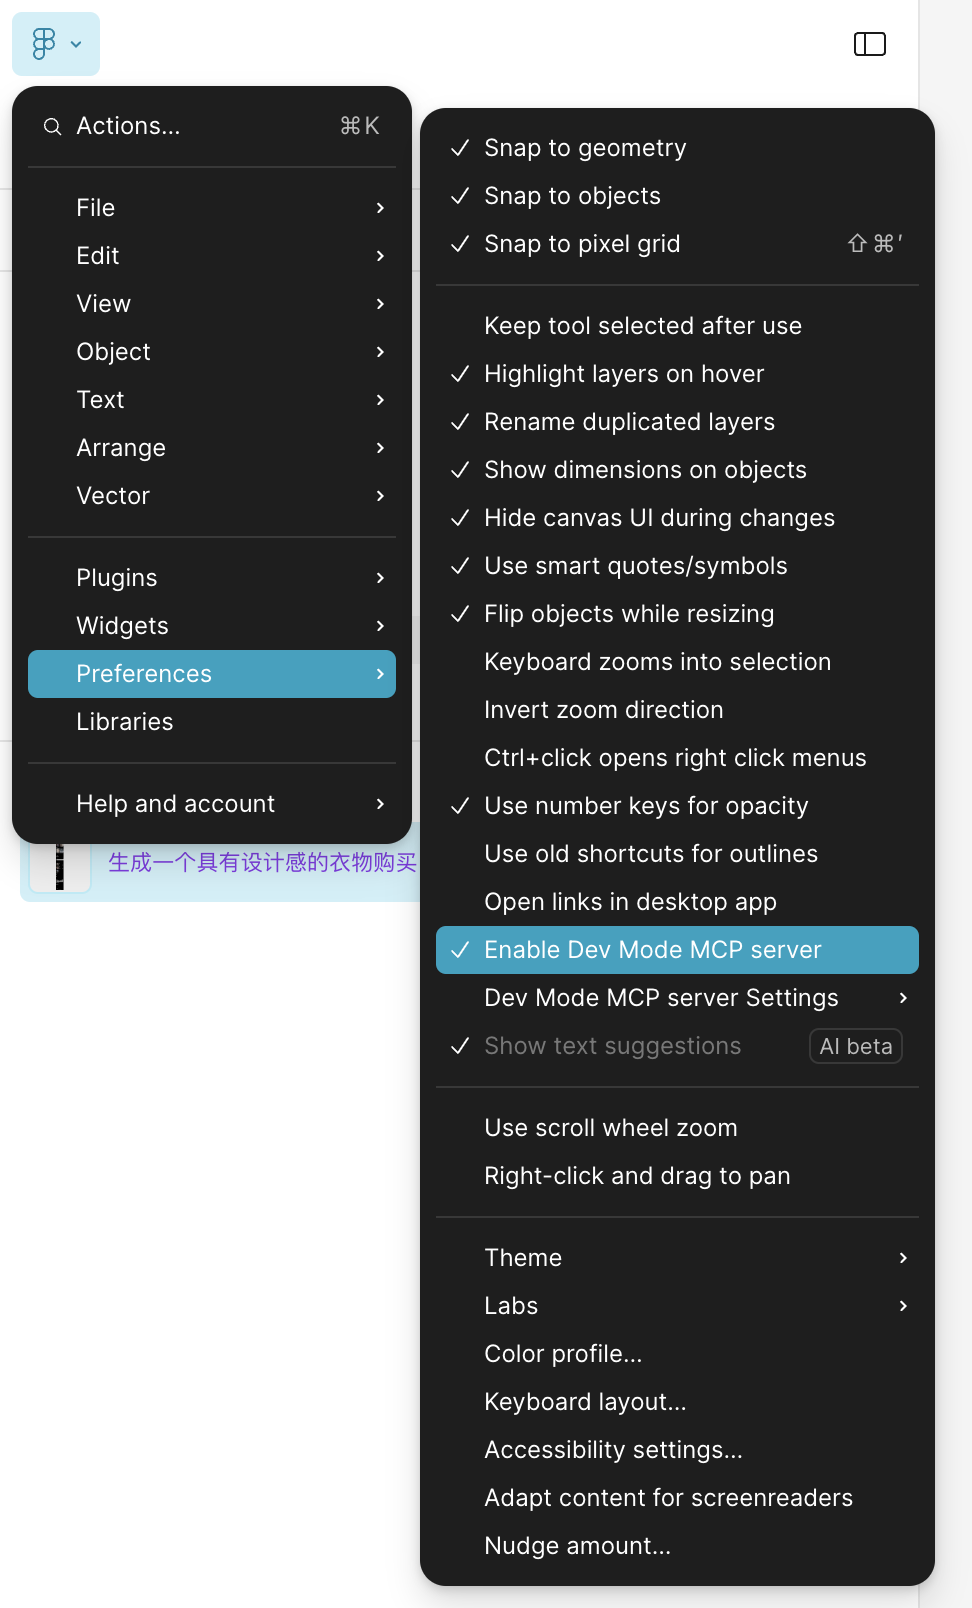
claude, and enter/mcpto verify that the default CloudBase MCP server configuration is normal. - Open the Figma desktop client (Figma MCP Server can only be set up in the desktop app), and as shown, select Preferences -> Enable Dev Mode MCP Server to start the MCP Server
- Add the Figma MCP Server configuration (along with the context7 MCP Server) to the
.mcp.jsonfile in your project root, as follows:
    {
      "mcpServers": {
        "cloudbase": {
          "command": "npx",
          "args": ["-y", "@cloudbase/cloudbase-mcp@latest"]
        },
        "Figma": {
          "url": "http://127.0.0.1:3845/sse"
        },
        "context7": {
          "command": "npx",
          "args": ["-y", "@upstash/context7-mcp@latest"]
        }
      }
    }
Note: I'd like to share a pitfall I hit here. When updating the
.mcp.jsonconfig, I found that Claude didn't recognize the newly added MCP configs. I found a manual way to add them in the official docs.For sse type:
claude mcp add --transport sse Figma http://127.0.0.1:3845/sse. For command type:claude mcp add context7 -- npx -y @upstash/context7-mcp@latest
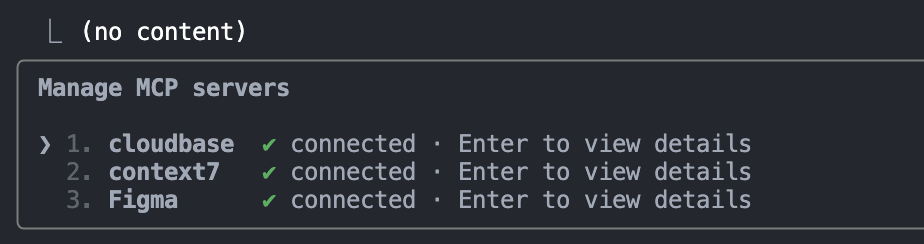
Once all three MCP configs are added, running /mcp shows the following:
- Following Figma MCP's official best practices, you can append a custom Figma rule at the end of CLAUDE.md:
    <user_custom_rules>
    # MCP Servers
    ## Figma Dev Mode MCP Rules
     - The Figma Dev Mode MCP Server provides an assets endpoint which can serve image and SVG assets
     - IMPORTANT: If the Figma Dev Mode MCP Server returns a localhost source for an image or an SVG, use that image or SVG source directly
     - IMPORTANT: DO NOT import/add new icon packages, all the assets should be in the Figma payload
     - IMPORTANT: do NOT use or create placeholders if a localhost source is provided

    </user_custom_rules>
This rule prevents Claude Code from arbitrarily downloading assets from the internet (which may fail), and instead uses the assets provided by Figma.
Step 3: Frontend interaction development
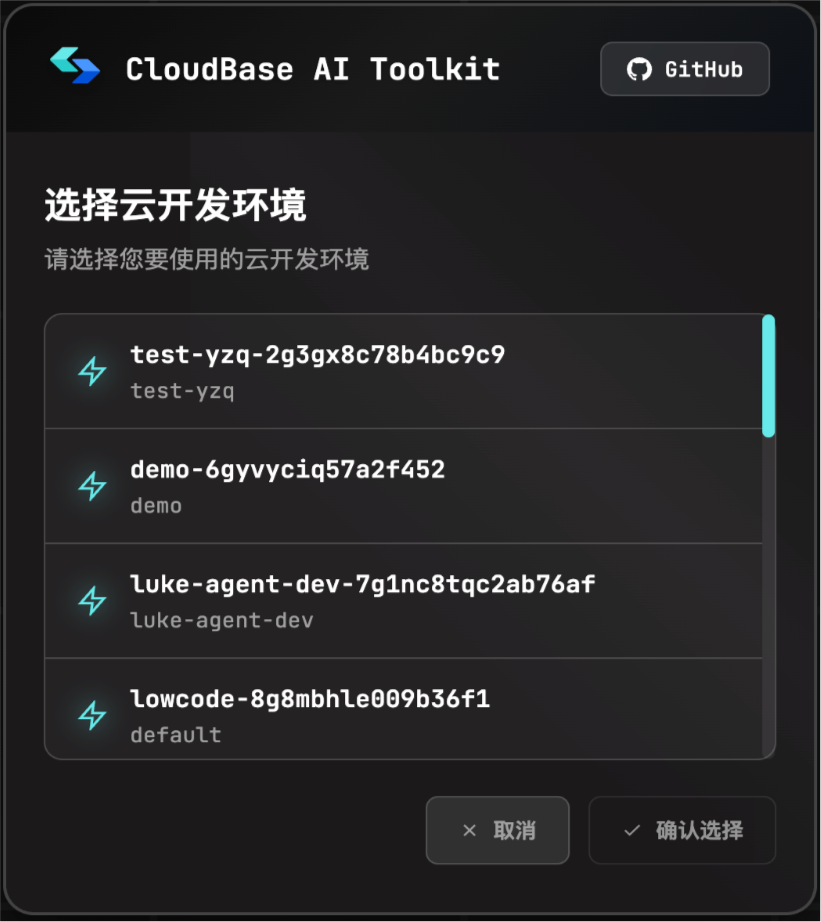
- First log in to the CloudBase cloud development environment (you need to create an environment on the CloudBase platform first). Type "log in to CloudBase" in the dialogue box.
- The browser will first pop up the authorization on the CloudBase platform. After authorizing, an environment selection confirmation box pops up. Choose an environment to finish logging in.
- Have Claude Code connect to the Figma MCP to reproduce the frontend interactions from the prototype mockup.
Claude Code can interpret the component structure of the Figma design mockup and generate the corresponding mini-program page code
First make sure the currently generated Figma design mockup is in a selected state, then enter the following prompt in the Claude command line:
Based on the currently selected Figma design mockup, convert it into code implementation and complete the following application:
A stylish clothing-purchasing e-commerce mini-program with 4 pages:
- Mall home page, waterfall display of product images
- Clicking a product image on the home page navigates to the product detail page, where items can be added to the cart
- Shopping cart page, displaying the selected product item info, with a "buy now" option
- Personal center page, displaying order information
Notes:
- When reading UI details from the design mockup, you must use the get_code method
- Once you complete the frontend interaction implementation, you must confirm with me before proceeding to the backend development
After entering this, Claude invokes the Figma MCP Server's get_code tool to read the design mockup details (as shown below), and then Claude proceeds to reproduce the frontend interactions.

Step 4: Backend logic development and deployment
Once you've confirmed through several rounds of iterative dialogue that the frontend interactions are working correctly, you can ask Claude Code to start developing the backend logic, with the following prompt:
Now let's implement the backend logic, using Cloud Functions to complete the business logic:
- Product list page data reading (you may pre-populate the database with a batch of product data)
- Product detail data reading
- Product ordering (generating orders)
- Order list query
- Leave the specific payment implementation empty for now
Claude Code combines with CloudBase MCP to complete the backend logic implementation and resource deployment:
- Generated and deployed the
businessCloud Function, containing logic for fetching product lists, fetching product details, creating orders, querying order lists, etc. - Created the
ordersandproductstables to store order and product info, usingopenidto identify the associated user.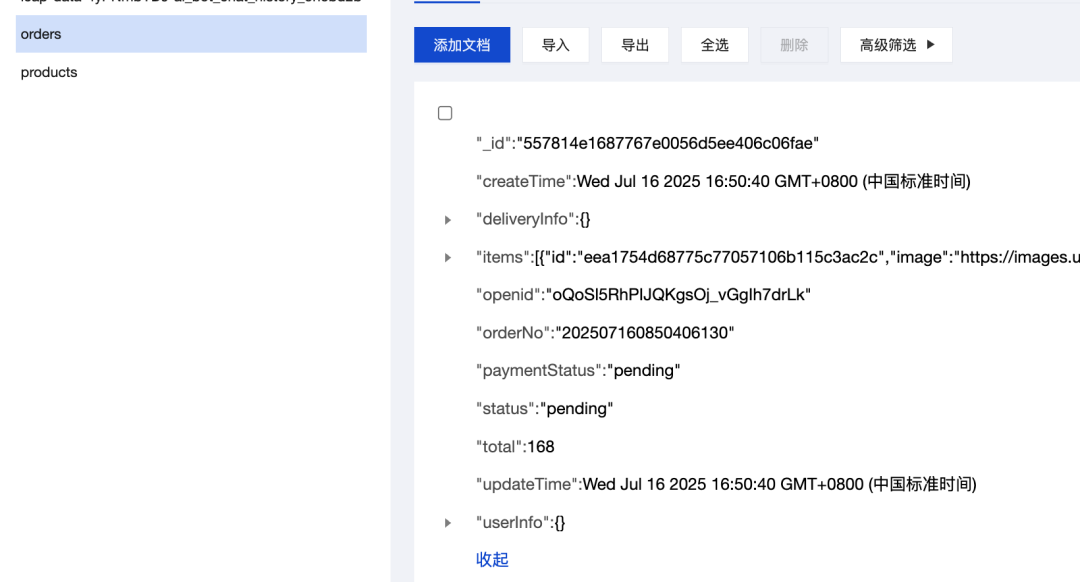
Step 5: WeChat Pay Cloud Template configuration
Configure the cloud template and merchant certificate info on the CloudBase platform:
-
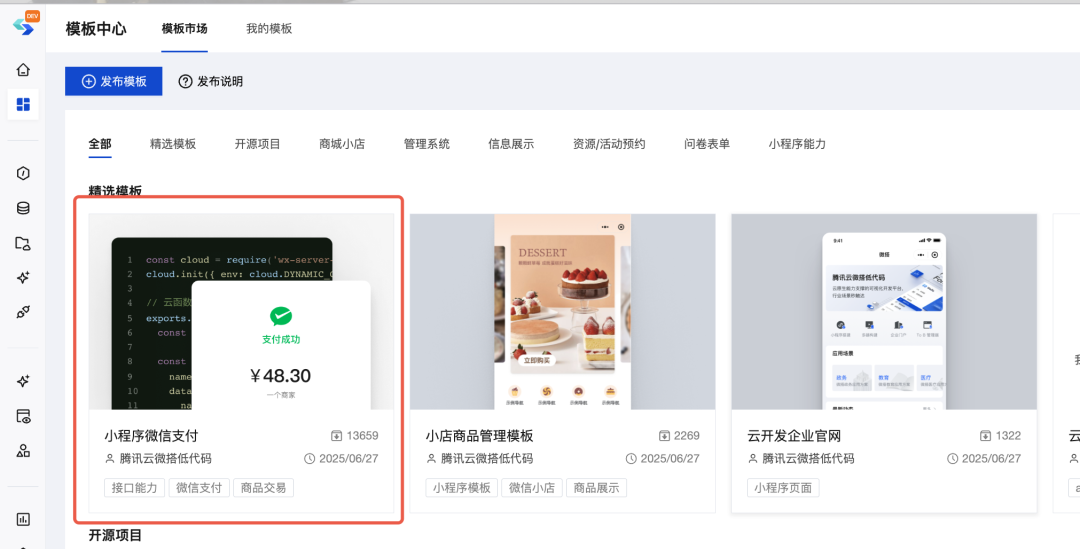
Enable the WeChat Pay cloud template
- Log in to the Tencent CloudBase platform
- Go to the template center
- Install the WeChat Pay template
-
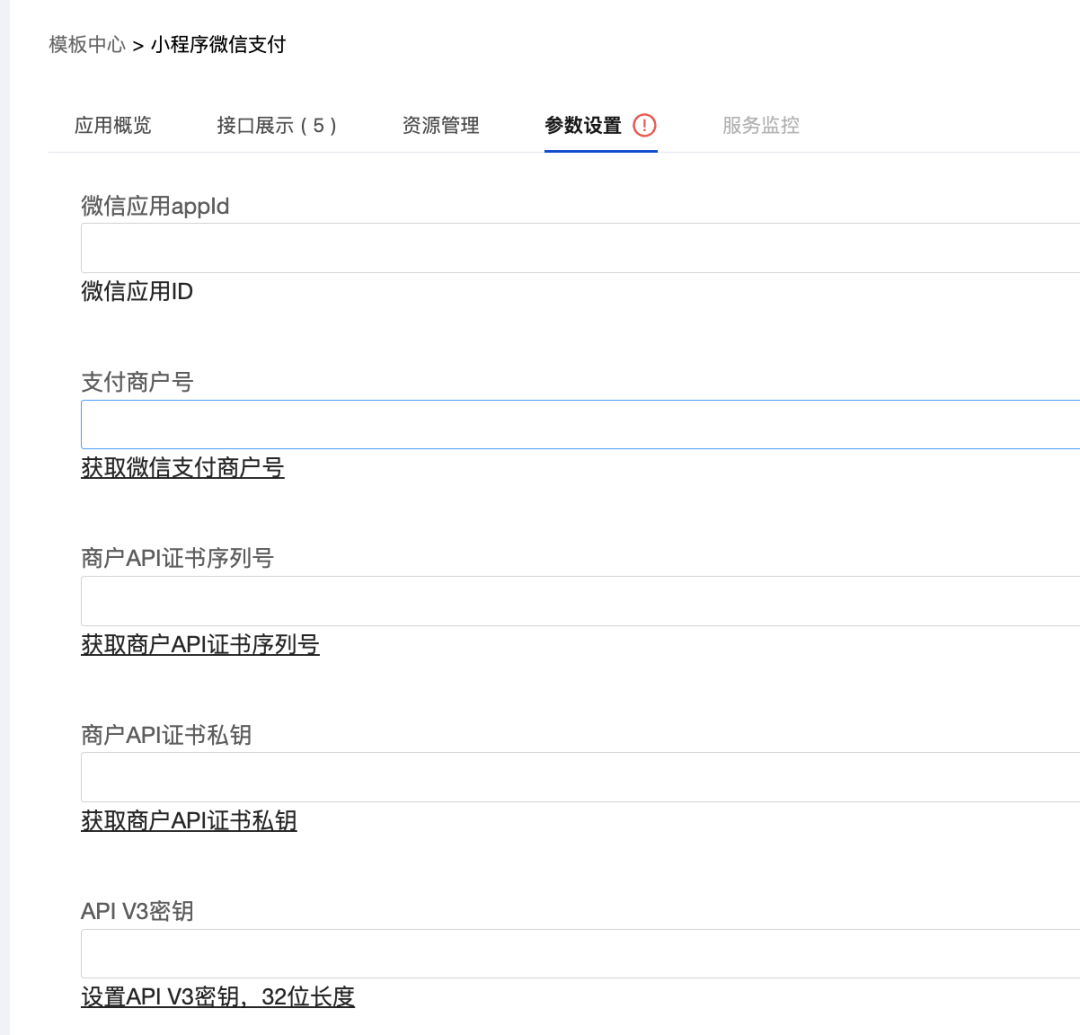
After installation, configure the merchant info
Later you'll also need to configure the Cloud Function that receives payment notifications. No need to configure it yet — it will be covered later.
If the WeChat Pay public key isn't enabled, no related configuration is needed.
- WeChat appId
- Merchant ID (mch_id)
- Merchant API certificate serial number
- Merchant API certificate private key
- API V3 key
- Check the Cloud Function list to confirm the
wxpayFunctionsCloud Function has been deployed.
wxpayFunctionshas the relevant WeChat Pay flows built in, such as mini-program ordering, order querying, refunds, etc.
- Tell Claude to use CloudBase tools to download the
wxpayFunctionsCloud Function locally (to thecloudfunctionsdirectory), because the AI will later need to modify the Cloud Function code based on the business logic.
Step 6: Rewriting the WeChat Pay order-creation logic
Let Claude Code combine with Context7's documentation capability, based on the wxpayFunctions template code, to fill in the WeChat Pay ordering logic within the mini-program:
- Enter "use context7, help me implement the mini-program ordering logic by referring to the documentation" in the Claude Code command line. You can also manually add some official WeChat Pay doc links to the context for reference.
The Context7 MCP tool searched for payment-related API documentation materials.

Core payment flow diagram (here the backend JSAPI ordering doesn't need our attention — it's already built into the template logic):
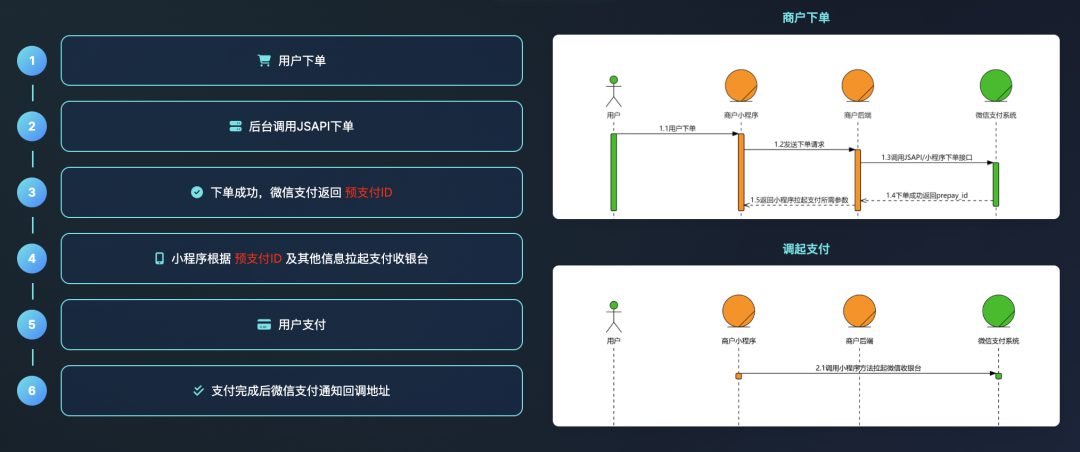
- After Claude learns the relevant docs, it automatically writes the logic for the client to initiate ordering, trigger the checkout page after success, update order status, and more.
Step 7: Creating the WeChat Pay order callback notification logic
After the user completes the payment action, the WeChat Pay backend pushes a payment result notification to a Cloud Function. We need to create a Cloud Function to handle this notification and update the order status.
-
Enter the following prompt in the Claude Code command line:
- To make real payment testing easier, divide the actual price by 1000 before calling the payment interface.
- Please continue to implement the WeChat callback notification Cloud Function for after a successful payment, referring to step 5 of this document: https://tcb.cloud.tencent.com/cloud-template/detail?appName=wx-pay-v2
Note: The callback notification function is a new function — you may name it
wxpayOrderCallback. Your implementation should strictly follow step 5 of that document.
Here I had Claude directly read the callback notification example in CloudBase's official cloud template documentation (I fed it the doc link), and it created the wxpayOrderCallback Cloud Function to handle WeChat Pay callback notifications.
Once the wxpayOrderCallback Cloud Function is deployed, you need to fill scf:wxpayOrderCallback into the "Cloud Function for receiving payment notifications" in the template, similar to what was configured in step 5. This way, when the WeChat Pay backend pushes a payment result notification, it will invoke the wxpayOrderCallback Cloud Function.
🎉 And just like that, a minimal e-commerce mini-program is complete
- ✅ Product browsing and search
- ✅ Shopping cart management
- ✅ Order creation and querying
- ✅ WeChat Pay integration
- ✅ Real-time payment status updates
- ✅ Order history management
Of course, compared with mature e-commerce mini-programs on the market, this project still lacks a lot, such as logistics/shipping, address management, product recommendations/reviews/favorites, and more. But I believe that after reading this article, everyone will be capable of extending these features together with the AI.
🤔 The real experience of AI coding
The whole project took about two days. Compared with traditional development approaches it's really much faster. Based on the CloudBase + Claude Code + Figma development toolchain, I've summarized the following advantages:
- Generating design mockups with AI lets people who don't know design quickly produce good-looking interfaces.
- Claude Code + CloudBase can quickly implement frontend and backend logic and resource deployment.
- The CloudBase WeChat Pay cloud template helps implement payment functionality quickly, without worrying about complex payment flows.
- The various product tool costs for a solo developer are far lower than hiring different specialists in a traditional development model.
- AI coding helps entrepreneurs quickly validate business ideas, lower the cost of trial and error, iterate fast, validate fast, and adjust fast.
💌 Final words
This AI-driven commercial application practice deeply impressed me, because it truly can help us build applications with commercial value. AI tools aren't here to replace programmers — they let everyone with an idea become a creator.
🔗 Related links
- Figma MCP official docs: https://help.figma.com/hc/en-us/articles/32132100833559-Guide-to-the-Dev-Mode-MCP-Server
- context7 docs: https://context7.com/
- CloudBase-AI-Toolkit: https://github.com/TencentCloudBase/CloudBase-AI-ToolKit
- CloudBase WeChat Pay cloud template docs: https://tcb.cloud.tencent.com/cloud-template/detail?appName=wx-pay-v2